Perfecting Your Point (aka Ankle Plantarflexion)
In last week’s Barefoot Strong Blog article I focused on optimizing ankle joint dorsiflexion, which honestly is most of the focus when it comes to the ankle joint and human movement. However, I wanted to take a chance to focus on the opposite movement, ankle joint plantar flexion.
With the rise in body weight training and programs such as Animal Flow, the interest in optimizing point or ankle joint plantar flexion is definitely on the rise!
The Purpose of Plantar Flexion
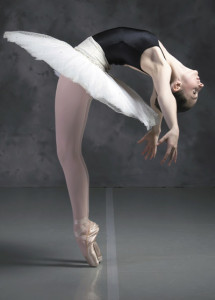
Before we get into body weight training, let’s focus on the baseline functional movement pattern – walking. When we walk, we use ankle joint dorsiflexion to properly load the potential energy of impact forces and then release that stored energy as we transition into ankle joint plantar flexion. This transition to an ankle plantar flexed position is called a rigid lever – and in my opinion is the most important position of the human foot..
The rigid lever, as seen in the image to the right, is a foot position unique to 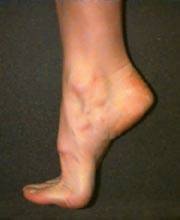 humans and necessary for bipedalism. The rigid lever is a locked, stable position of power and is created by ankle joint plantar flexion, subtalar joint inversion and tibial external rotation.
For every day ambulation we need approximately 50 degrees of ankle joint plantarflexion to optimally release energy and transition into the push-off phase of gait.
But what if we are looking for function of our ankle that is beyond that of walking. What if we are a dancer, gymnast or bodyweight athlete?
How much plantarflexion do we need then?
Plantar Flexion and Body Weight Training
There are many sports and training techniques in which the plantar flexed ankle is no longer necessary as it relates to being on the ground and pushing off. In the case of gymnastics and dance, joint alignment and joint position are a form of art and aesthetics. The point of a dancer’s foot creates lines and angles that are pleasing to the human eye and defy what we “think’ the human body can achieve.
In addition to aesthetics, there is fascial and tension-based power behind the human foot and the plantar flexed position. The stiffness of a plantar flexed foot translates beyond just the foot itself, and travels through co-contractions and fascial lines to the deep core and hips.
This is one of the key concepts we teach in the Barefoot Training Specialist Level 1 Certification – and is referred to as foot to core sequencing. When we point our foot, we are essentially achieving the same foot to core stability of short foot – it’s just happening open chain. Let’s call it short foot in the air!
Let’s test it out.
Version 1 – With NO foot to core tension.
Hang on a pull-up bar.
Relax the feet and only engage the abs when executing a pull-up.
Note how easy or difficult that was to perform, as well as any tension or stiffness in the body.
Version 2 – WITH foot to core tension.
Hang on the pull-up bar.
Engage the feet by plantar flexing the ankle and engaging foot intrinsics. At the same time engage the deep core and glutei muscles.
Note how easy or difficult that was to perform, as well as any tension or stiffness in the body.
Did you notice a difference between the two?
You should have felt that there was more integrated, innate strength with the foot to core version!
This is just a small example of how a bodyweight athlete or gymnast harnesses the power of the body when they are not on the ground.
Getting the Perfect Plantar Flexion
Dance and gymnastics stress the human body’s flexibility to such extremes that there is an advantage to starting these sports when we are younger as our connective tissue is more pliable and responsive to stress.
 This is very much the case when it comes to ankle joint plantar flexion!
So let’s say you are an adult and new to body weight training – or maybe always wanted to point your toes like a dancer but when you plantar flex your ankle it looks like the image to the right!
You are frustrated because it doesn’t look like the point of a dancer. So you try harder. Contracting your foot muscles thinking it will make your foot point more.
Unfortunately that doesn’t work and you end up with a foot cramp! You start sitting on your feet thinking that if you do this every day you will eventually get that point.
Will you ever get that perfect point?!
To achieve the point we desire so much requires us to better understand the anatomy of the ankle joint and soft tissue structures that surround it.
The Anatomy of Plantar Flexion
The ankle joint, formed by the tibia, fibula and talus bones, moves through dorsiflexion and plantar flexion in the sagittal plane. Now although the ankle joint is thought of as a hinge joint, it is actually quite complex, moving through an oblique axis of motion.
Much of the ankle joint mobility is in relation to the tibia and talus articulation and the associated unique shape of the talar dome. The top of the talus, or talar dome, is triangular in shape with a narrower posterior aspect. This unique shape allows the talus to shift forward (anterior) as the foot transitions into a plantar flexed position.
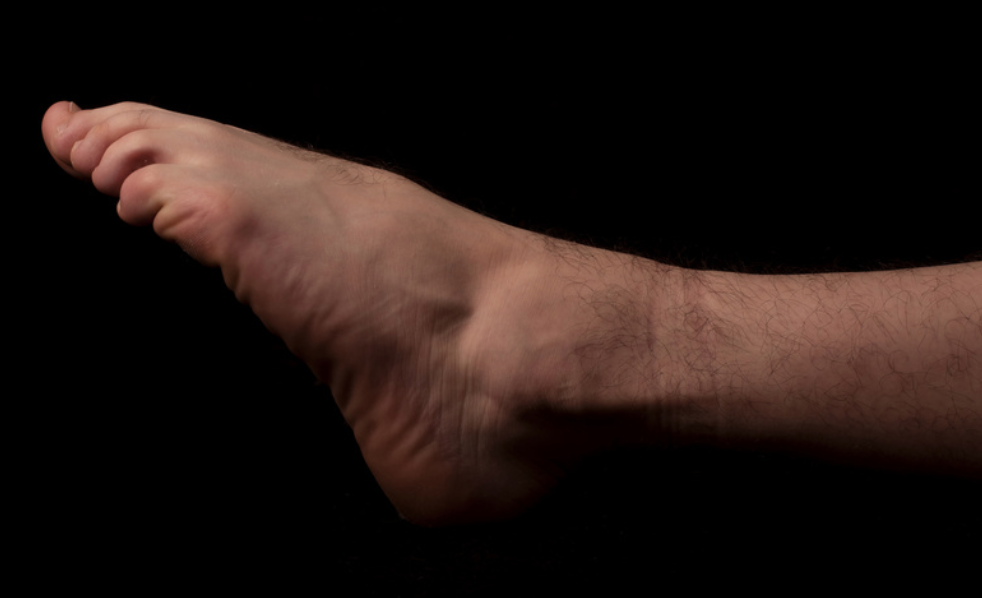
In the image below we can appreciate that the talus needs to have good centration and mobility in order to maximally plantar flex the ankle. In last week’s article I discussed how dancer’s with ligament laxity are easily able to achieve extreme plantar flexion but at the price of reduced dorsiflexion on the way down as the talus typically can stay anteriorly shifted. Learn more on that concept and how to re-center the ankle joint HERE
If you are looking to achieve a dancer’s point this is characterized by 100° or more plantar flexion 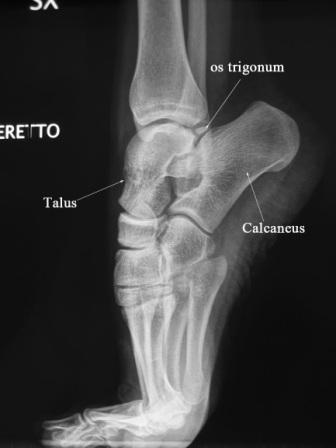 with 40% of that plantar flexion motion occurring in the joints of the midfoot. You want to see the dorsal border of the talus and navicular in line with the anterior border of the tibia. Or the top of the foot in line with the shin bone.
Now what if you are not getting the desired 100° platnar flexion? What can you do?
Step 1 – Make sure your talus is centered. This was demonstrated in last weeks article and this video.
Step 2 – Myofascially release the anterior lower leg muscles to increase fascial hydration. This can be done with a standard foam roller or stick.
Step 3 – Gently stretch the anterior ankle and mid foot ligaments. I like to do this by pointing my toes and pushing down gently at the forefoot. or you can also use modalities such as this foot stretcher Very important note here is to not stay in this position without a release for more than a couple minutes as you are also stretching nerves!
Want some additional point exercises you can check out this video below:
Some last tips for that perfect point include:
Tip 1 – Don’t over-activate the intrinsics as this will only result in curling of the toes. You want to think about reaching and lengthening the foot – not pulling or curling the foot down.
Tip 2 – Be mindful of how long you stay in a foot stretcher or if you are sitting on your feet. I have had patients do this too long and give themselves a neuropraxia where they stretch the nerves and damage it. You don’t want to get foot drop! Do not exceed more than a couple minutes at a time.
Tip 3 – Accept the reality that if you are an adult with poor foot mobility chances are you may never achieve the perfect point – but that’s okay! You can still create optimal foot to core sequencing during your bodyweight movements.
As always – stay #barefootstrong !
Dr Emily Splichal